Introduction: Why Create a Gamepass?
Earning Robux is a common goal for many Roblox creators, and one of the most straightforward ways to do so is by offering gamepasses. These are one-time purchases that grant players special perks, abilities, or items within your experience. Whether you are building a donation game or an adventure world, gamepasses provide a steady income stream while enhancing gameplay. In this tutorial, I show you how to create a gamepass from scratch using the Roblox Dashboard, so you can start monetizing your game today.
What Is a Gamepass?
A gamepass is a virtual item that players can buy once to unlock permanent benefits in your Roblox game. Common examples include double jump, extra speed, VIP access, or exclusive tools. Unlike developer products, which can be purchased multiple times, gamepasses are one-time unlocks tied to the player’s account. Understanding this distinction is key before you start building. In this video I show you the entire process, from dashboard setup to in-game scripting, so you can implement gamepasses smoothly.
Step 1: Accessing the Roblox Dashboard
To begin, you need to log into your Roblox account and navigate to the Create page. This is your central hub for managing all experiences. Click on "Create" at the top of the Roblox website, then select "Dashboard" from the menu. If you have multiple games, choose the one where you want to add a gamepass. Here's how you can confirm you are in the right place: look for the game’s name and thumbnail at the top of the Dashboard page. If you haven't published a game yet, you need to do that first before creating a gamepass.
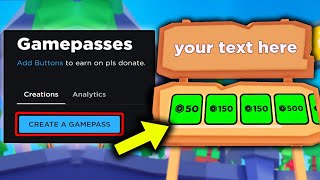
Step 2: Creating the Gamepass Itself
On your game’s Dashboard page, find the Monetization section on the left sidebar. Click on "Passes" or "Game Passes" (the exact label may vary based on Roblox updates). You will see a button that says "Create a Game Pass". Click it, and you will be taken to the creation screen. Here you need to upload an image that represents the pass—this can be a 512x512


![How To Create & Publish A Gamepass! [Roblox]](https://i.ytimg.com/vi/WT_FGN4usok/mqdefault.jpg)


