Introduction to Taking Screenshots on Windows 10 Laptops
Learning how to screenshot on laptop Windows 10 is a fundamental skill that can be useful in various situations, such as capturing important information, saving a snapshot of a webpage, or sharing an image with friends and family. In this article, we will explore the different methods of taking a screenshot on a Windows 10 laptop.
Why Take Screenshots?
Taking screenshots can be a powerful tool for communication, education, and problem-solving. Whether you want to show a friend how to use a particular software, capture a memorable moment, or document a technical issue, screenshots can be a quick and easy way to convey information. In this tutorial, find out how to take a screenshot on your Windows 10 laptop using four easy methods.
4 Easy Ways to Take a Screenshot on Windows 10
In this video, I'll show you four easy ways to take a screenshot on your Windows 10 laptop. These methods include using the Print Screen button, the Windows Snipping Tool, the Windows Game Bar, and the Microsoft Snip & Sketch app.
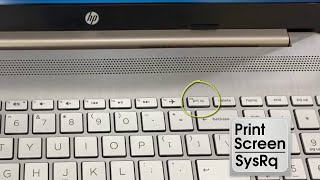
Method 1: Using the Print Screen Button
One of the simplest ways to take a screenshot on a Windows 10 laptop is by using the Print Screen button. To do this, press the Print Screen button on your keyboard, which is usually located on the top row of keys. This will capture the entire screen and save it to the clipboard. You can then open an image editing software, such as Microsoft Paint, and paste the screenshot into a new image.
Method 2: Using the Windows Snipping Tool
The Windows Snipping Tool is a built-in utility that allows you to capture a screenshot of a specific area of the screen. To access the Snipping Tool, click on the Start menu and type "Snipping Tool" in the search bar. Once you've opened the Snipping Tool, you can choose from four different capture modes: Full-screen, Window, Rectangular, and Free-form. Select the mode that best suits your needs and capture the screenshot.
Method 3: Using the Windows Game Bar
The Windows Game Bar is a feature that allows you to capture screenshots and record gameplay on your Windows 10 laptop. To access the Game Bar, press the Windows key + G on your keyboard. This will open the Game Bar, which includes a screenshot button that allows you to capture the entire screen. You can also use the Game Bar to record video and audio, making it a useful tool for creating tutorials and walkthroughs.
Method 4: Using the Microsoft Snip & Sketch App
The Microsoft Snip & Sketch app is a modern screenshot tool that allows you to capture and annotate screenshots on your Windows 10 laptop. To access the Snip & Sketch app, click on the Start menu and type "Snip & Sketch" in the search bar. Once you've opened the app, you can choose from three different capture modes: Full-screen, Window, and Rectangular. The app also includes a range of annotation tools, such as pen, highlighter, and eraser, which allow you to add notes and comments to your screenshots.
Conclusion
Learning how to screenshot on laptop Windows 10 is a simple process that can be achieved using a variety of methods. Whether you prefer to use the Print Screen button, the Windows Snipping Tool, the Windows Game Bar, or the Microsoft Snip & Sketch app, taking a screenshot on your Windows 10 laptop is a quick and easy way to capture and share information. By following the steps outlined in this article, you'll be able to take high-quality screenshots and improve your productivity and communication skills.