Introduction to Taking Instant Screenshots in Windows 11
There are a number of ways to take screenshots in Windows 11, and whether you need to capture a specific moment on your screen or want to document a process, this guide will walk you through the various methods available. In this article, we will explore how to take screenshots in Windows 11, covering the different techniques and tools that you can use to achieve this task.
Why Take Screenshots?
Taking screenshots can be useful in a variety of situations, such as when you want to share information with others, document a bug or issue, or simply to keep a record of something on your screen. Whether you are a student, professional, or casual computer user, knowing how to take screenshots is an essential skill that can save you time and effort in the long run.
Method 1: Using the Print Screen Button
One of the simplest ways to take a screenshot in Windows 11 is by using the Print Screen button, which is usually located on the top row of your keyboard. To take a screenshot using this method, simply press the Print Screen button, and the screenshot will be saved to the Clipboard. You can then open an image editing program, such as Microsoft Paint, and paste the screenshot into the program to save it as an image file.
Method 2: Using the Windows + Print Screen Buttons
Another way to take a screenshot in Windows 11 is by using the Windows + Print Screen buttons. This method will save the screenshot directly to a folder called "Screenshots" in your Pictures library, eliminating the need to open an image editing program to save the screenshot. To use this method, simply press the Windows key and the Print Screen button at the same time, and the screenshot will be saved automatically.
Method 3: Using the Snipping Tool
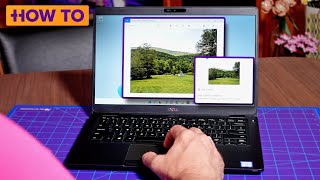
The Snipping Tool is a built-in utility in Windows 11 that allows you to take screenshots of a specific region of your screen. To access the Snipping Tool, you can search for it in the Start menu or type "snippingtool" in the Run dialog box. Once you have opened the Snipping Tool, you can choose from several different modes, including Full-screen Snip, Window Snip, and Rectangular Snip, to capture the desired area of your screen.
Method 4: Using the Game Bar
The Game Bar is a feature in Windows 11 that allows you to take screenshots and record videos of your gaming sessions. To access the Game Bar, you can press the Windows key + G, and then click on the "Take screenshot" button to capture a screenshot of your current screen. The screenshot will be saved to the "Captures" folder in your Videos library.
Additional Tips and Tricks
In addition to the methods mentioned above, there are several other tips and tricks that you can use to take screenshots in Windows 11. For example, you can use the Windows + Shift + S keys to open the Snipping Tool and take a screenshot of a specific region of your screen. You can also use the Delay feature in the Snipping Tool to take a screenshot after a specified delay, which can be useful for capturing menus or other transient elements on your screen.
Conclusion
In conclusion, taking screenshots in Windows 11 is a straightforward process that can be accomplished using a variety of methods. Whether you prefer to use the Print Screen button, the Snipping Tool, or the Game Bar, there is a method to suit your needs. By mastering the art of taking screenshots, you can become more efficient and effective in your work and personal projects. Ready to master the skills you need to succeed? Learn more about Windows 11 and other topics by visiting https://link.xelplus.com/yt-d-all-courses. This video shows you multiple easy ways to take screenshots in Windows 11, and by following the tips and tricks outlined in this guide, you will be well on your way to becoming