Water Cycle Poster Project: A Fun DIY Activity for Kids
Creating a Water Cycle Poster Project is an excellent way to bring science to life in the classroom or at home. This hands‑on activity helps children visualize how water moves through the environment while developing art skills, fine‑motor coordination, and scientific vocabulary. Below you’ll find a step‑by‑step guide, a list of required materials, and tips for turning a simple poster into a vibrant teaching tool.
Why a Water Cycle Poster?
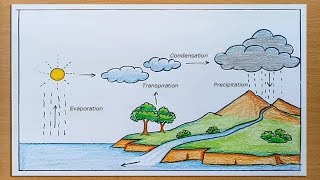
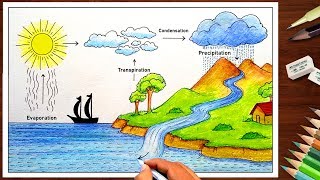
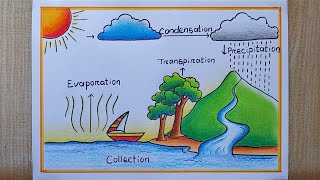
Kids often struggle to imagine the invisible processes that drive weather patterns. A poster provides a visual anchor that makes the watercycle concrete and memorable. When students can point to clouds, evaporation, condensation, and precipitation on a single sheet, they are more likely to retain the concepts during later lessons.
Materials You’ll Need
- Large poster board (22 × 28 in works well)
- Construction paper in blue, white, green, and brown
- Markers, crayons, or colored pencils
- Scissors and glue stick
- Cotton balls (for clouds)
- Blue cellophane or clear plastic wrap (optional for a 3‑D effect)
- Stickers or printed images of the sun, mountains, and oceans
- Index cards for labeling each stage
Step‑by‑Step Instructions
- Plan the Layout – Sketch a rough diagram on a scrap piece of paper. Position the sun at the top left, a body of water at the bottom, and clouds in the middle. This roadmap keeps the project organized.
- Create the Background – Cover the poster board with a light blue wash to represent the sky. Use darker blue paper for the ocean and green paper for land masses.
- Draw the Sun – Cut a bright yellow circle from construction paper and glue it in the upper corner. Add rays with markers to emphasize sunlight, the driver of evaporation.
- Make Clouds – Pull apart cotton balls and shape them into fluffy clouds. Secure them with glue above the water source.
- Show Evaporation – Using a blue marker, draw wavy lines rising from the ocean toward the clouds. Label these lines “Evaporation” on an index card.
- Illustrate Condensation – Inside each cloud, add tiny white dots or a light spray of water with a paintbrush. This represents water vapor turning into droplets.
- Depict Precipitation – From the clouds, draw falling lines that end in raindrop shapes. Use a darker blue or teal to differentiate rain from the sky.
- Show Collection – Below the rain, illustrate streams flowing back to the ocean or into a lake. Add arrows to indicate the direction of water flow.
- Label the Cycle – Attach the prepared index cards around the poster, connecting each label with a thin arrow. This reinforces the sequence: Evaporation → Condensation → Precipitation → Collection.